eCommerce Website Development with Drupal is a technical process requiring expertise. The blog offers details on the same.
Drupal has come a long way since its launch in 2001 and today it continues to prove its strength as a leading platform for building online stores. Known first as a flexible content management system (CMS), Drupal has grown into a powerful foundation for eCommerce website development as well.
Thousands of businesses, from startups to large enterprises, trust Drupal to run their online shops because of its scalability, security, and ability to deliver tailored shopping experiences.
What makes Drupal eCommerce development stand out is the combination of content management and commerce features under one roof. Unlike many platforms that require endless plugins or workarounds, Drupal with the Drupal Commerce module offers an all-in-one solution for managing products, handling orders, and publishing content with ease. This seamless setup reduces dependency on third-party tools and minimises risks of compatibility issues or performance glitches that can hurt revenue.
Another reason businesses lean toward Drupal is its open-source nature. It’s free to use, supported by a large global community, and constantly updated to stay relevant in a competitive digital world. The community regularly introduces new modules, features, and integrations, making Drupal not only adaptable but also future-ready for businesses that want to expand.
Ease of use is also a major highlight. Even with its advanced features, Drupal eCommerce websites are designed to be user-friendly. The admin interface makes it simple to create, edit, and publish content without needing deep technical knowledge. For businesses, this means better control over their online store and less reliance on developers for everyday changes.
Most importantly, Drupal gives brands the freedom to shape unique and personalised shopping journeys. Whether it’s supporting multiple languages, offering subscription models, or integrating AI-driven recommendations, Drupal eCommerce solutions allow businesses to stand out and connect with customers on a deeper level.
In today’s crowded eCommerce space, having a platform that blends strong content tools with robust commerce capabilities is no longer optional, it’s a must. Drupal delivers exactly that, making it a smart choice for anyone planning to build a reliable and scalable online store.
How to Build an eCommerce Website with Drupal?
Setting up an eCommerce website with Drupal may sound complex, but with the right steps and planning, the process becomes straightforward. Partnering with a Drupal CMS development company can make it even easier, as they bring expertise in building secure, scalable, and customizable online stores. Drupal is not just a content management system—it also provides a solid foundation for eCommerce when combined with the Drupal Commerce module. Below, we’ll walk through the process and share some best practices to help you avoid common pitfalls.
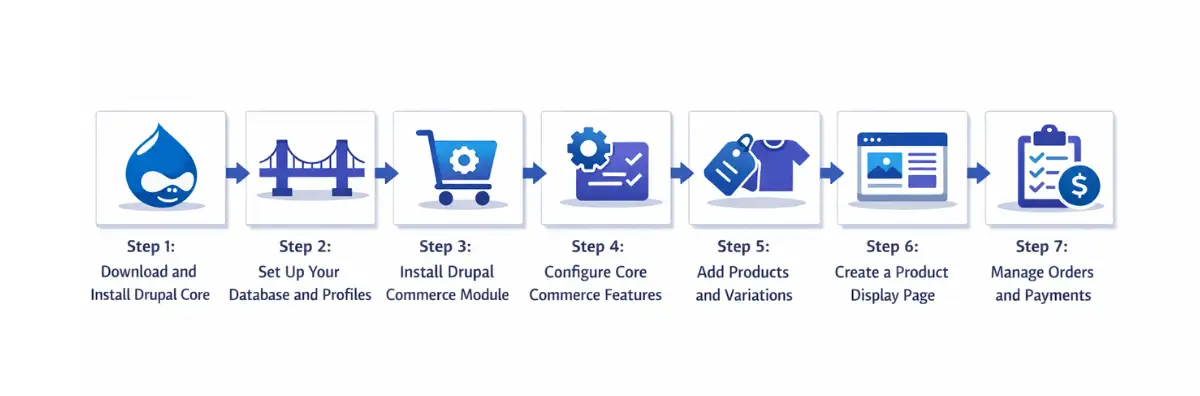 Step 1: Download and Install Drupal Core
The first step in your Drupal website development journey is installing the latest Drupal core. There are two ways to do this:
Using Composer (recommended):
- Run the following command in your console: Composer manages dependencies automatically, ensuring a smooth setup.
composer create-project drupal-composer/drupal-project:9.x-dev my_dir --no-interaction
- From the Drupal official website: You can also download the core files directly, but Composer is more efficient and reduces compatibility issues later.
If external dependencies are required, Composer is the best option. While you can also use the Ludwig module, Composer provides more reliability and saves time during installation.
Step 2: Set Up Your Database and Profiles
During installation, Drupal asks for database access details. You can choose from preconfigured site profiles or start with the minimal profile for a clean setup. After installation, use the Configure Site page to tailor the site to your business needs.
Step 3: Install Drupal Commerce Module
To bring eCommerce features into your site, you’ll need to install the Drupal Commerce module. With Composer, use this command:
This installs Commerce and its required dependencies. Once enabled, you’ll see a new “Commerce” menu in your admin panel, where you can access all store-related settings.
Step 4: Configure Core Commerce Features
Once installed, set up the basics:
- Store Settings: Define your default store, currency, taxes, and payment methods.
- Commerce Tax Module: Enable it if you need tax rules for different regions.
- Commerce Promotion Module: Create discounts or offers to attract customers.
- Commerce Number Pattern Module: Generate product IDs with custom rules for easy inventory tracking.
- Commerce Store Module: Run multiple stores with separate settings under one Drupal installation.
Step 5: Add Products and Variations
Next, it’s time to build your catalog:
- Navigate to Commerce > Products > Add Product.
- Create product types with required fields like title and description.
- Use the Product Attributes feature for variations (size, color, specs, etc.).
- Add images, SKU numbers, and custom fields for better organisation.
Drupal automatically generates product variation widgets on the front end, allowing customers to select attributes like color or size.
Step 6: Create a Product Display Page
Use Drupal’s Views to display products:
- Go to Structure > Views > Add View.
- Choose “Show Product” and select the “Create a Page” option.
- Customize filters, sorting, or faceted search using modules like Search API and Facets for a user-friendly browsing experience.
Step 7: Manage Orders and Payments
All orders are accessible under Commerce > Orders, where you can track, update, and manage transactions. Set up payment gateways (PayPal, Stripe, or custom integrations) after preparing your environment for smooth, secure transactions.
Best Practices for Drupal eCommerce Website Development
 Building a store is just the first step. To ensure your Drupal eCommerce website runs smoothly, keep these practices for Drupal eCommerce Development in mind:
-
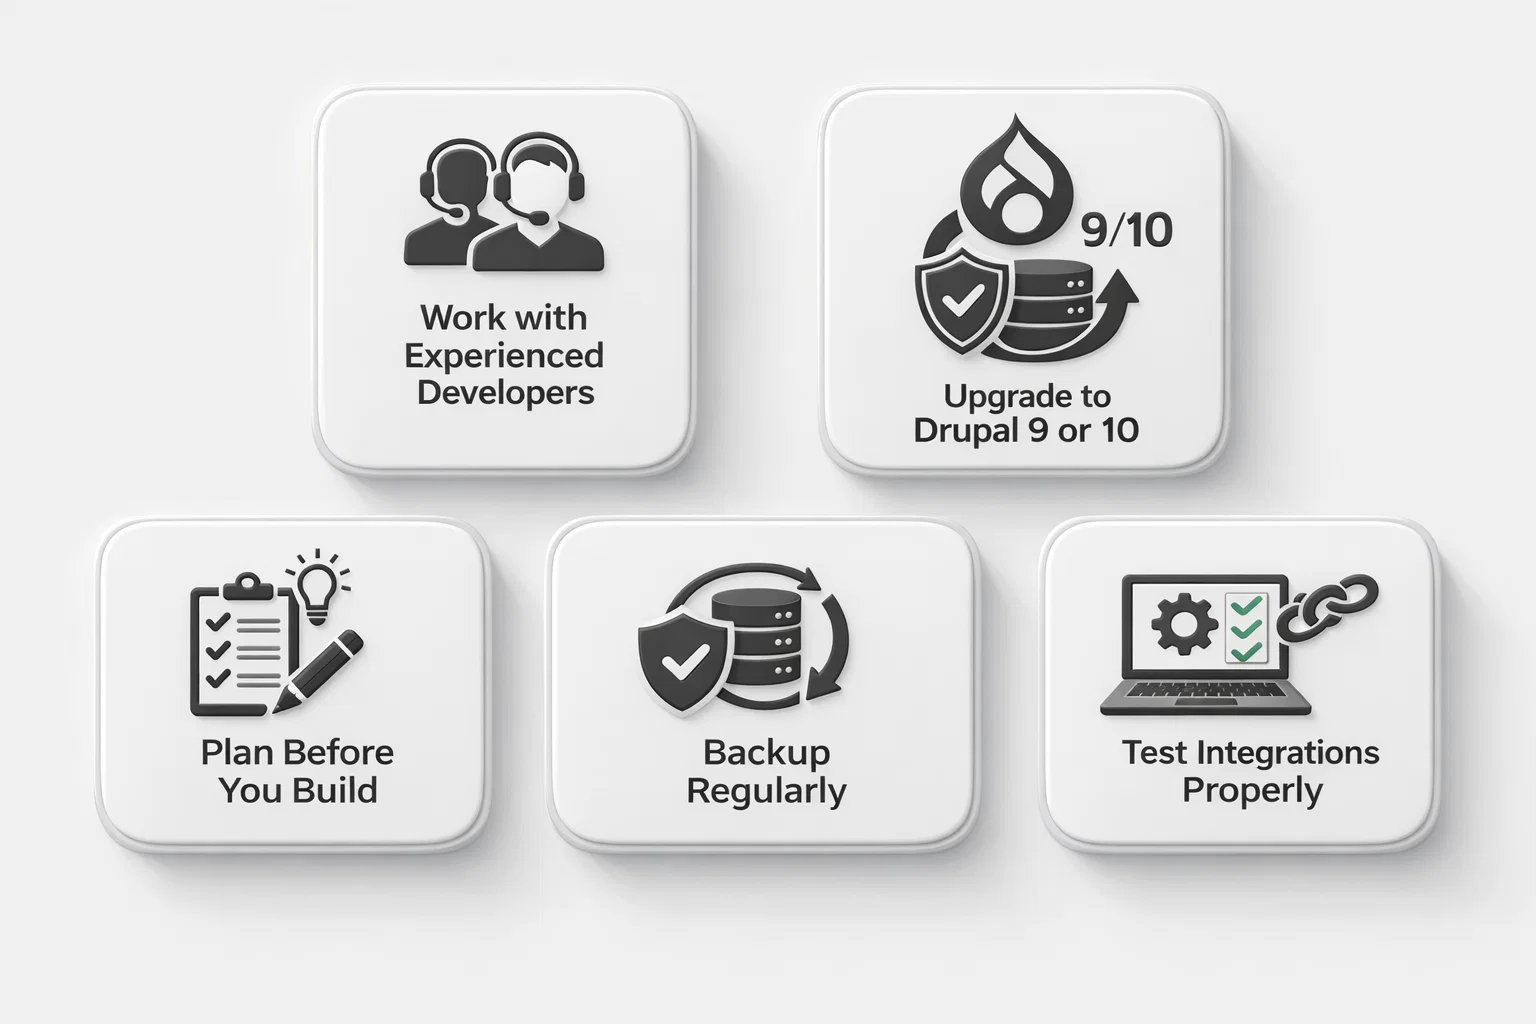
Work with Experienced Developers
Professional Drupal developers can save you time, reduce errors, and make your site more secure.
-
Upgrade to Drupal 9 or 10
Drupal 8 is already retired, and Drupal 7 support ends in January 2025. Migrating ensures security updates and long-term stability.
Read More: Step-by-Step Guide to Migrating from Drupal 9 to Drupal 10 or 11
-
Plan Before You Build
Define your must-have features, integrations, and design preferences early. This prevents overcomplication later.
-
Backup Regularly
Protect your store against cyberattacks or mistakes by storing data backups securely in the cloud or offline.
-
Test Integrations Properly
Whether it’s payment gateways or shipping tools, always prepare your environment and test thoroughly before going live.
Choosing the Right Drupal eCommerce Website Developer
Choosing the right people to build your Drupal ecommerce website is one of the most important steps in the journey. Since Drupal is a flexible but complex platform, you need experts who know how to make it work for online stores.
 Here are some practical ways to discover skilled Drupal ecommerce developers and make the right choice for your business.
-
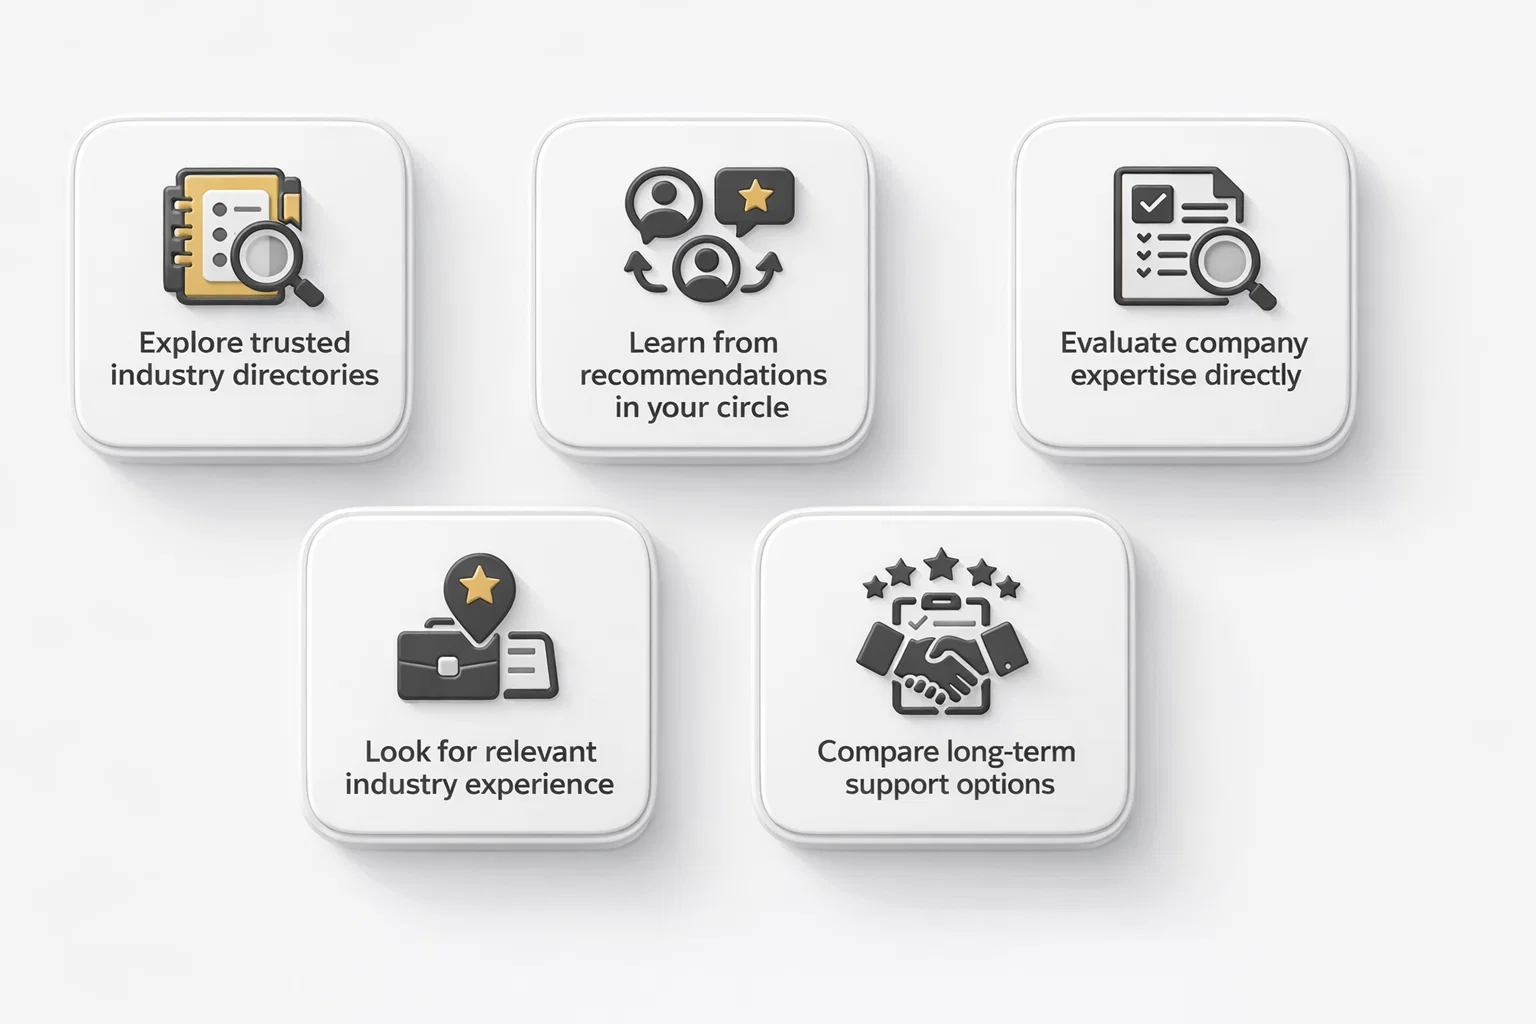
Explore trusted industry directories
Instead of starting from scratch, begin with well-known business directories that focus on digital agencies. Websites like Clutch or GoodFirms highlight top-rated Drupal ecommerce companies with verified reviews, ratings, and project details. These platforms give you a quick snapshot of which developers have real experience with ecommerce projects, saving you hours of research.
-
Learn from recommendations in your circle
Sometimes the most reliable insights come from people you already know. Ask business peers, colleagues, or partners if they have worked with a Drupal ecommerce company before. Word-of-mouth recommendations can reveal both the strengths and possible challenges of working with a particular team. This helps you shortlist developers who have already proven their value to someone you trust.
-
Evaluate company expertise directly
Once you have a list of potential Drupal Commerce development companies, don’t stop at reading profiles. Take the next step and reach out. Ask about their past projects, the kind of ecommerce website Development solutions they’ve delivered, and the industries they serve. A quick consultation or interview will help you understand not only their technical skills but also their communication style, responsiveness, and approach to problem-solving.
-
Look for relevant industry experience
A Drupal ecommerce website for farmers, retailers, or global brands will all have different needs. So, check whether the developers you are considering have built ecommerce stores similar to yours. Ask them to share case studies or examples of their work in your sector. This will give you confidence that they understand your niche and can deliver practical, scalable solutions.
-
Compare long-term support options
Launching your farming ecommerce store or agriculture ecommerce website is only the beginning. Make sure the Drupal ecommerce developers you choose also offer ongoing support, updates, and upgrades. A good partner will not only help you set up but also stand by you as your online store grows.
Visit here for Maintenance and Support Service: Ecommerce Website Support and Maintenance
Final Thoughts: Why Drupal is a Smart Choice for eCommerce
Picking the right ecommerce platform is never just a technical decision, it’s a business one. Your choice will shape how your store performs, how customers experience it, and how easily you can grow in the future.
Drupal Commerce stands out because of its flexibility, scalability, and ability to handle complex ecommerce needs. Whether you are building a farming ecommerce website, an agriculture ecommerce marketplace, or a large-scale retail store, Drupal gives you a strong foundation. It lets you manage products, payments, and user experiences while keeping your site secure and adaptable.
But remember, the platform alone is not enough. Partnering with the right Drupal ecommerce developers is what will truly make the difference. They will ensure your online store is not just functional, but also user-friendly, future-proof, and aligned with your business goals.
In short, if you are serious about building a powerful ecommerce website that can scale with your business, Drupal is worth the investment. Contact IDS Logic for all your Drupal development and ecommerce needs, from building new sites to ongoing support.
Frequently Asked Questions
Q1. Why should you choose Drupal Commerce over other ecommerce platforms?
Drupal Commerce is built to support highly customised online stores. Unlike plug-and-play solutions, it allows deep flexibility in design, integrations, and scalability. This makes it ideal for businesses with unique needs or those planning to expand quickly.
Q2. Is Drupal ecommerce suitable for small businesses?
Yes. While Drupal is often used for enterprise websites, small and mid-sized businesses can also benefit. With the right setup, it offers a secure, affordable, and scalable way to build a professional ecommerce site.
Q3. How much does it cost to develop a Drupal ecommerce website?
The cost varies based on your requirements, features, design, integrations, and level of customisation. Since Drupal itself is free, most of the investment goes into development, hosting, and ongoing support.
Q4. Can Drupal ecommerce websites handle high traffic?
Absolutely. One of Drupal’s strongest features is scalability. With proper optimisation, it can handle large product catalogs and high visitor traffic without compromising speed or security.
Q5. What should we look for when hiring a Drupal ecommerce development company?
Look for proven experience in ecommerce projects, industry-specific expertise, and a strong support structure. A reliable Drupal partner should be able to share case studies, offer ongoing maintenance, and clearly explain how they’ll align the website with your business goals.